I held the warp in place on the collar base with hair grips while I stitched it in place.
When most of the warp was in place, I attached the collar to the neck edge.
Finally I attached the edge strands. These ones continue down the front and around the hem.
I wove the collar first. What fun to get the brown wool out and see the collar take shape!
Then it was time to weave the edgings.
Once the weaving was done, I undid all the holding stitches. Then I could see that the edge of the collar got stretched out of shape while weaving.
I pulled it to the right shape with gathering thread. Then I worked from the back and pulled out loops of the warp threads until the collar lay where it should. Then I cut the loops and buried the ends.
Once the collar was fixed, I pressed all the edges and began to experiment with the placement of the zip.
The cuffs and pocket edges look lovely and hold their shape well.
I spent a whole day making the tracing paper pattern for the collar to create a neat tapered shape that lies flat across the shoulders and has a smooth transition to the front edging bands. It has three sections: one to fill in the neck edge, a collar stand, and the collar itself.
I cut it out precisely in fusible interfacing and adhered it to the backing fabric.
I drew on as many warp lines as I could figure out while the pieces were flat, then I assembled it into its final 3-D shape and drew on the rest of the lines where they cross seams.
The edgings for the hem and front opening are straightforward, using the same method as for the cuffs and pockets. The front corners turn nicely where the softness of the material allows me to create an inside curve with a half inch radius. I tacked the edgings base to the garment.
I temporarily pinned on the collar base to check the fit. I'll take it off to attach most of the warp threads, then tack it onto the jacket.
I'm experimenting as I go along for the next steps, starting with the simpler things(edging on cuffs and pocket openings) in the hopes that I will learn what I need to know to do the harder things (the collar and front and hem edgings which need to be done as a unit).
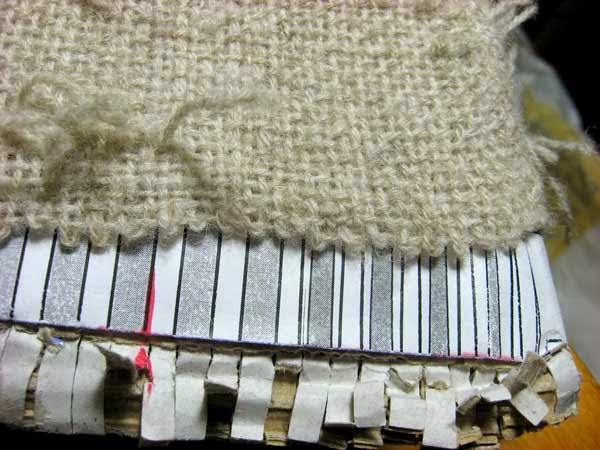
To make a base to hold the warp for the tapestry sections I used a needle lace method: the actual-size drawing on paper of the pocket opening was reinforced with a backing of fabric and a covering of clear plastic. On the drawing I marked each of the seven warps. The base extended far enough under the fabric edge that it could be tacked in place with holding stitches.
I held the warps temporarily in place with bobby pins/hair grips.
Then I secured all the warp threads in position with holding stitches.
I wove over pairs of warps to make a weft-faced padded band. The fabric edge and the first strand became the first "pair" of warps.
After weaving, I removed all the holding stitches.
The big unknown in this project was whether the completed weaving with all its shaping would act the way my simple samples did and shrink the expected 20% in width and 25% in length. It took two times in the washing machine on an "easy care" setting at 30 degrees and with a 800 rpm spin cycle and one more rinse cycle before the jacket shrank to my expected final size. I measured each time and compared to the original sewing pattern measurements to determine when it was completely fulled. Next I pressed it on a low setting under a press cloth while it was still damp and hung it on the dressmaker's dummy to finish drying overnight. The fabric feels springy and comfortable and no longer looks like sacking. The edges are firm and even and the ends protruding from the inside surface are well felted and secure. It feels great to wear even without all the finishing touches I have planned. In all the excitement I forgot to photograph the jacket before I began doing things to it. You can see where I have begun to work on the pocket and cuff.
Once the jacket was completely released from the weaving form, I measured again. As I expected, there was very little change in the width because I wove carefully to allow for take-up in the weft, but there was quite a bit of difference in the length because the warps had been stretched taut. They bounced back approximately 5% when released. Next I prepared the jacket for fulling. ENDS: I pulled all the darned-in ends to the back and trimmed them to about an inch long. These will remain inside the jacket as little felted anchors to keep the ends from working out to the front of the fabric.
curved neck edge before and after whip stitching
CURVES: I whip-stitched along the pocket openings and neck edge to help stabilize the curves.
POCKETS: I herringbone-stitched the two layers of the pocket together along the tops and sides. I left the edges that meet the jacket front and hem loose because these will be combined into the edging which will be woven on after fulling.
I lightly tacked a layer of plastic between the two layers of the pockets. That way the fabric can shrink but there will be no danger of the pocket felting shut.
SLEEVE JOIN: I removed the hemstitching and bias strip that had stabilized the edge of the sleeve opening. Then I pulled up a few threads to even out the weaving.
The extra warp threads which stopped at the shoulder to provide ease were darned in on the inside of the jacket shoulder. The shoulder easing looks quite effective and the darned-in ends provide a bit of firmness on the shoulder line.
sleeve join before and after stitching
I was disappointed to see that a section of the join at the front and back of each sleeve had big uneven holes. The problem was that the curve at this section of the sleeve was really steep, so there weren't very many warp threads to incorporate into the jacket body. If I had foreseen this, I would have left some weft threads hanging out to use in between these, but instead I turned all the weft threads back into the sleeve, expecting that the warp threads would be enough to form the join. I experimented with extracting some weft threads from the sleeve and weaving them across the gaps, but this was fraught with difficulty and impractical at this late stage of the project, so in the end I used some stitching to fill in the gaps.
While the jacket was still on the weaving form, I measured it in various dimensions. to compare with after "take off" and after fulling.
Also, I took the opportunity while it was still held taut, to do some darning in. There were warps tied off at pins to create shaping in various places.
I untied them and darned one end downward and one end upward.
Then as I gradually unpicked the holding stitches around the hem...
I darned in warps and drew up slack where needed.
Then the edge was even.
With the hem free, I could turn back the overpockets to reveal the underpockets...
Repeating the process I used on the back, I wove the fronts up to the top of the shoulder until all the sleeve warps were woven into the jacket body. All that was left were two triangles at the top of each shoulder which met across the back.
I started from the front neck edge. I turned at the shoulder to cross the back to the other shoulder where I turned to meet the other front neck edge. I repeated this until I filled up to the back neck. Then I finished each shoulder triangle separately.